Locomotive Loli-9451

Locomotive name
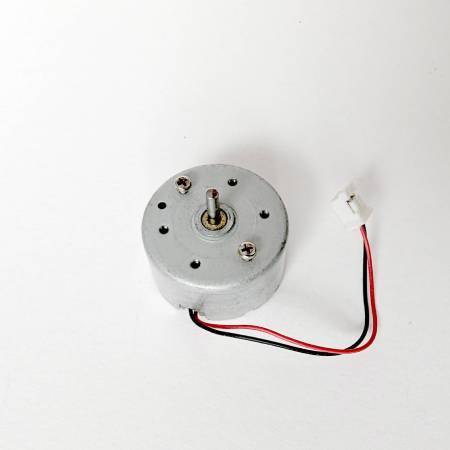
This is the first locomotive I have built. It went through an enourmous amouont of changes both in structure and looks. The name came from a label on the motor I took out of some old CD ROM drive.

Acquiring parts
So this locomotive uses a motor from an old CD ROM drive. The headlight is an LED from a dead LED light bulb. Cables are made from old PATA HDD flat cables which are stripped down into wires. You can salvage all these components from your old electronics as I would strongly recommend, but they are also widely available in the market.

Wheels
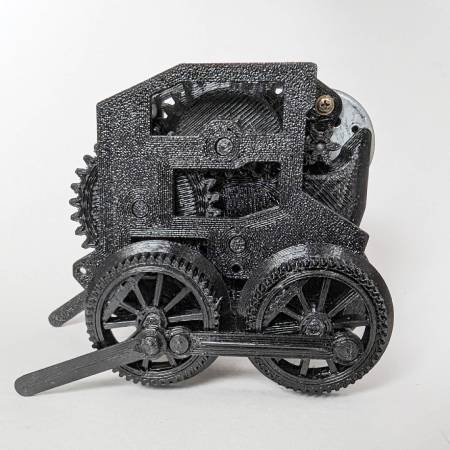
It has two front wheels which rotate in a carriage to follow the shape of the track. There are 4 drive wheels in the back mounted on a gear reductor with the motor. In order to increase traction, the locomotive features rubber tyres which are 3D printed. Also to improve traction, especially when there are more wagons attached, the locomotive is filled with fishing weights and amounts to aproximatelly 500gr in weight.

Connector
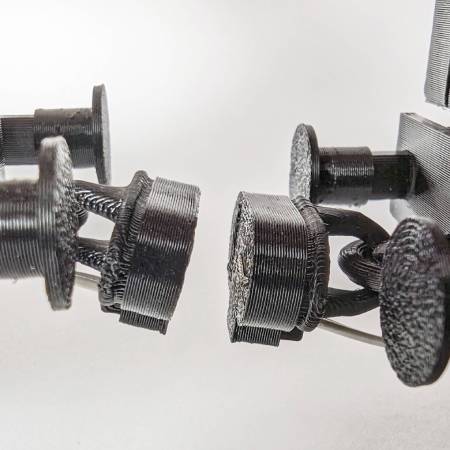
The connector is magnetic and it transfers electricity. Magnets are 6mm x 3mm neodymium magnets, also widely available in the market. Connectors are assembled with or without super glue. This way you can attach the locomotive and all the wagons easily and they can all be powered. The locomotive receives power through the connector, the batteries are not located in the locomotive. There is a coal wagon for this.
Think about the environment
I have done my best to design the locomotive in such a way that it can be easily repaired and if really necessary salvaged. It is both sturdy and doesn't use too much plastic. So be responsible to the environment if things go wrong and try to reuse or repair whatever you can. Let's make this a legacy game and not a consumer one :)
Build instructions
Building the locomotive involves printing and cleaning parts, wiring and asswmbly.
Instructional videos will show a recommendation for slicing parts. But you can also find a better way while you build your own.
If you have never worked with soldering, there are great videos on YouTube to show you the basics. That should be just enough to acquire a skill to get this done.
There are also dedicated videos to wiring here so you should be covered.
Weights are used to make the locomotive heavier in order to provide better traction and stability. Propper weight displacement is very important. My recommendation (as you will also see in the tutorials below) is 200grams for the front and 140grams for the back of the locomotive. Of course, you can play arround the weight and see if you find something even better. However keep in mind that the front of the locomotive needs more weight than the back to keep the front wheel carriage on the track.
For a full reference of necessary materials and tools, go to Tools & Materials.
Chasis
Files
Part list
- 1 x chasis
- 1 x headlight
Important notes
- PLA recommended
- do not place more supports than necessary
- no brim

General parts
Files
Part list
- 4 x bumper-cap
- 1 x casing-left
- 1 x casing-right
- 2 x drive-actuator
- 2 x drive-connector
- 4 x drive-wheel
- 1 x front-wheel-carriage
- 1 x g1
- 1 x g2
- 1 x g3
- 1 x g4
- 2 x g5
- 1 x hidraulic-carriage
- 1 x roof
- 2 x wagon-wheel
- 1 x wagon-wheel-axile-sleve
- 1 x weight-lid
Important notes
- PETG recommended
- pay attention that all parts are perfectly level with the print bed while slicing
- you don't have to print all general parts at once
- avoid brim

Axiles
Files
Part list
- 2 x drive-axile
- 1 x wagon-wheel-axile
Important notes
- PETG recommended
- no supports
- with brim

Connector
Files
Part list
- 1 x connector-body
- 1 x connector-cap
Important notes
- PETG recommended
- connector body should be placed on the side
- do not go to far with supports
- no brim

Tyres
Files
Part list
- 4 x drive-tyre
Important notes
- TPU recommended
- print all at once
- no supports
- no brim

Assembly


